/ Reverse Proxy with Webflow


Martin Saposnic
What is a Reverse Proxy?
A reverse proxy is a server that sits in front of one or more servers, and acts as a gateway for client requests. When it receives a request, it can perform logic, and call external services before returning the response to the client.
Is this available natively?
Yes, Webflow offers Reverse-Proxy as a service for its paid users. Check out this article or get in touch with their sales team.
⚠️
Don't forget DNS changes can take up to 48 hours to propagate!
Prerequisites
This is a tutorial on how to set up your reverse proxy if you currently use Webflow. By setting up a reverse proxy you will be able to dd subfolders and subdirectories to your webflow hosted URLs from The.com.
Here's what you'll need:
- A Cloudflare Account with your domain connected
- A Webflow project (paid account) with the following structure set up
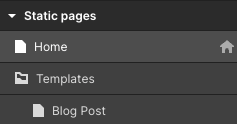
For this example, we will create a reverse proxy, which shows the Blog Post template page when a user navigates to /blog/<slug>.
Configure Webflow
Out-of-the-box Webflow does not support Cloudflare workers as they cannot provision SSL certificates if the domain is not pointing to them directly.
To resolve this, you can navigate to Project Settings > Publishing > Advanced Publishing Options and Disable SSL.
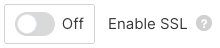
⚠️
If the option is disabled, you must first disconnect your domain name from
Webflow.
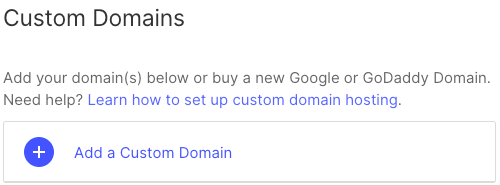
Manually connect your domain to Webflow
Next, you will need to add your custom domains to Webflow. You can do this by going to Project Settings > Publishing > Custom Domains
Update your DNS settings
To update your DNS settings, you must log into your Cloudflare account and add/edit the records indicated by Webflow.
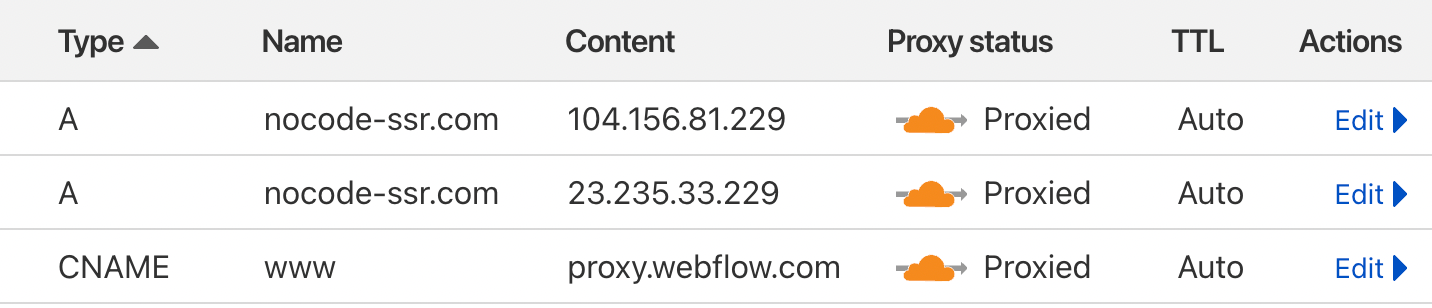
⚠️
Please note the CNAME & TXT values are proxy.webflow.com not
proxy-ssl.webflow.com
Create a Cloudflare Worker
Cloudflare Workers provide a serverless execution for adjusting existing infrastructure without changing it. You can read more about them here.
Log into Cloudflare and...
- Navigate to Workers & Pages
- Click "Overview"
- Click "Create Application"
- Click "Create Worker"
- Enter a name for the worker
- Hit "Deploy"
- Click "Edit Code"
- Copy the code from below and paste it in Cloudflare's code editor
- Change the 'Target' and 'Path Rewrite' to your values
- Save and Deploy
Copy and Paste this code:
// this is your the.com default url
const target = 'https://dear-jam-1019.the.com';
// this is the path rewrite rule
// e.g. www.webflow.com/blog/blogpost1 will be redirected to https://dear-jam-1019.the.com/blogpost1
const pathRewrite = ['/blog/', ''];

export default {
	async fetch(request: Request): Promise
	 {
		const response = await handleRequest(request);
		return response;
	},
};

async function handleRequest(request: Request) {
	const url = new URL(request.url);
	const modifiedURL = new URL(target);
	modifiedURL.pathname += url.pathname.replace(pathRewrite[0], pathRewrite[1]);
	const newRequest = new Request(modifiedURL, {
		method: request.method,
		headers: request.headers,
		body: request.body,
		redirect: 'manual',
	});

	const response = await fetch(newRequest);

	const newHeaders = new Headers(response.headers);
	newHeaders.set('Access-Control-Allow-Origin', '*');

	return new Response(response.body, {
		status: response.status,
		statusText: response.statusText,
		headers: newHeaders,
	});
}
Setup HTTP Routes
Routes allow you to map a URL pattern to a Worker. When a request is made to a URL that matches the pattern, the Worker runs before the application server (in this instance Webflow).
⚠️
Cloudflare's website has a complicated navigation. To navigate to the website routes, you will need to:
1. Click Websites in the side navigation
2. Select your domain (this changes the side navigation)
3. Click Workers Routes
Then you can configure service routes and bypass routes.
1. Click Websites in the side navigation
2. Select your domain (this changes the side navigation)
3. Click Workers Routes
Then you can configure service routes and bypass routes.
For this example you will need to add two routes:
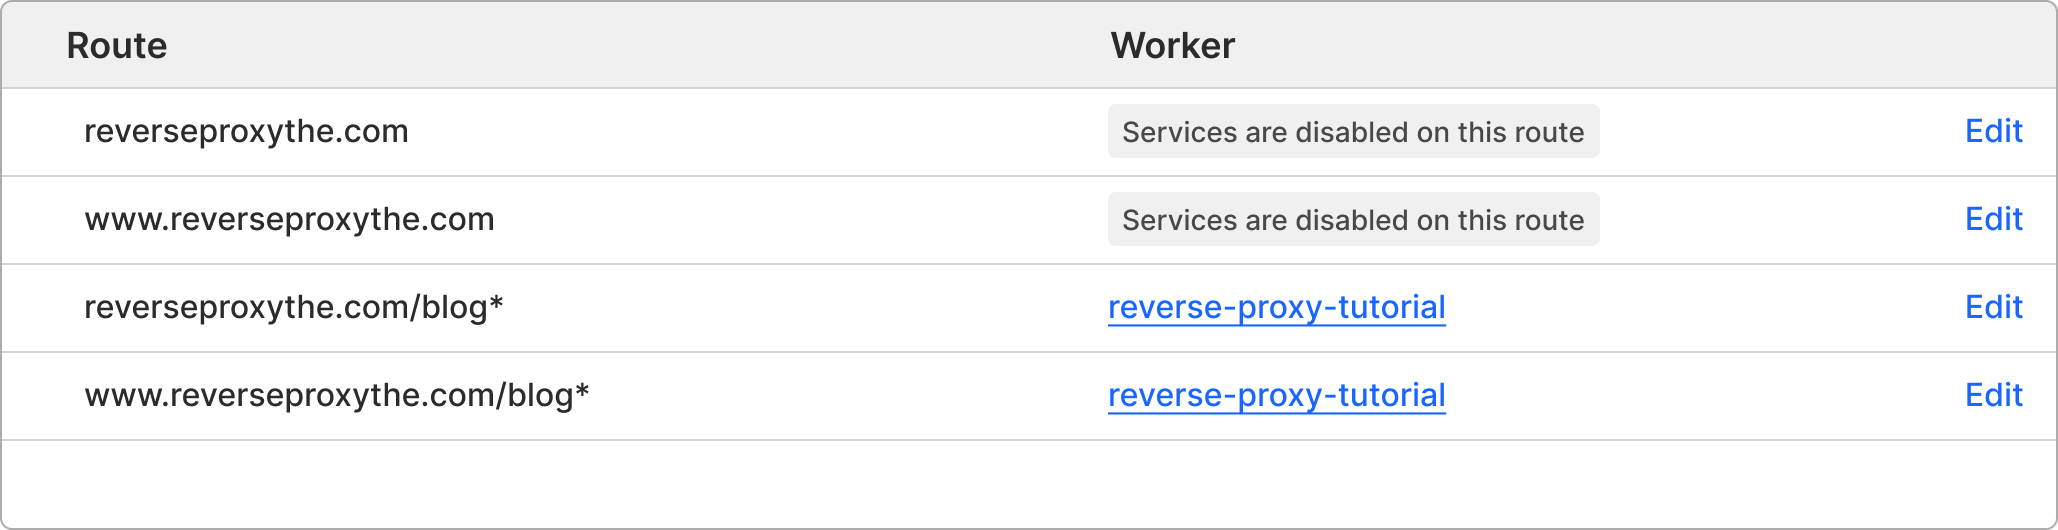
⚠️
Make sure you set the apex domain and the www. to "None". This will ensure / (Home) will bypass the Worker from triggering when a user accesses / (Home).
Test the Routes
First navigate to your home page and check its working as expected.
⚠️
If the home page is not working, it's likely your DNS updates have not
propagated. Wait 24 hours while your registrar updates your nameservers. You
will receive an email from Cloudflare when your site is active on
Cloudflare.
Next, navigate to example.com/blog/test you should be presented with the Blog Post page.
⚠️
If you receive a 404 error, it indicates the Cloudflare proxy is not
enabled, or the code is incorrect.
1. Double check the DNS records (A & CNAME) are being proxied
2. Double check the Worker's script to ensure its correct
1. Double check the DNS records (A & CNAME) are being proxied
2. Double check the Worker's script to ensure its correct
Finally when navigating
to
example.com/blog/ you should receive a 404
error.
⚠️
If you see the blog post template when navigating to /blog it indicates the
bypass route has not been configured or points to the Worker.
Special thanks to Matt from 8020 for being one of the first people to document How to Reverse Proxy a Webflow project with Cloudflare Workers.